How to Place a VRM Model in Your Space
To place a VRM model in the space, you need to follow these steps to avoid errors during the booth check.
Precondition: You are using Unity project set for submission by following the steps specified in the Submission Guide.
- Import the UniVRM unitypackage to the project. We have performed below steps using the version UniVRM-0.79.
- Drag the VRM file and drop into the submission folder. It will automatically create folders and files.
- (file name).Avatar folder
- (file name).AvatarDescription folder
- (file name).BlendShapes folder
- (file name).Materials folder
- (file name).Meshes folder
- (file name).MetaObject folder
- (file name).Textures folder
- (file name).vrm file, the one you have dragged and dropped
- (file name).prefab file
- Drag the (filename).prefab and drop into (exhibitor ID)/Dynamic in the Hierarchy of the submission scene.
- Right click on the Prefab added on the Hierarchy and select Unpack Prefab Completely.

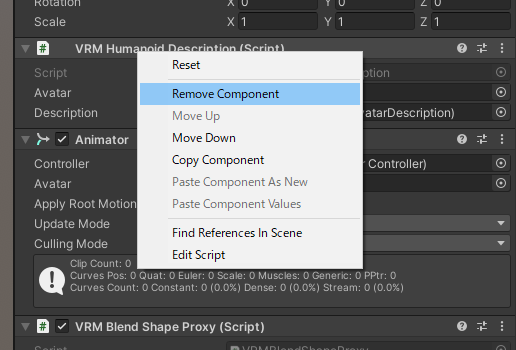
- Select the objects Unpacked and delete all components with names starting from “VRM” on the Inspector. This will leave Tranform and Animator only.
Note that if you have added VRM Spring Bone Collider Group or other things under Armature, you need to delete them too.
- Open the object in the Hierarchy and delete “secondary” object.

- Delete below folders and files created automatically at the step 2.
- (file name).AvatarDescription folder
- (file name).BlendShapes folder
- (file name).MetaObject folder
- (file name).vrm file
- (file name).prefab file
- Make necessary posing by rotating bones of the model and position adjustments.
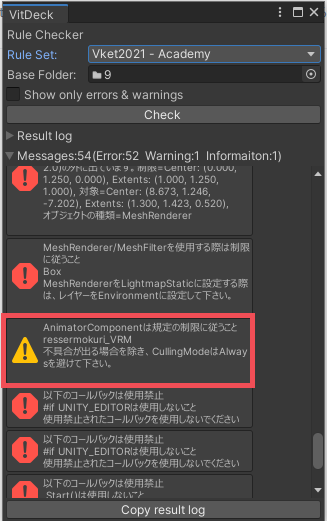
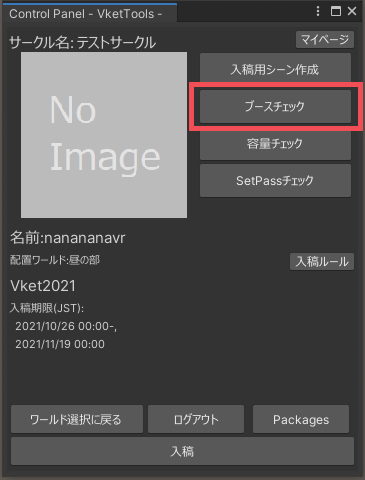
- Perform booth check with the submission tool Control Panel and make sure that no error is detected during the process.
Should you encounter warnings about Animator Culling Mode, change the Animator Culling Mode accordingly if possible.